Two posts in two days! Can you tell I have a week off!
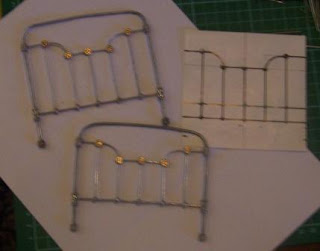
I have been wanting to get on with making this bed since I began making a quilt for it months ago so it was lovely to have several hours yesterday to do so, especially as I need it for a craft display next week (which also requires finishing the aforementioned quilt) This one is for my family's twin girls, Daisy and Violet to share and was in the house when the family inherited it from the father's godmother.
I began raiding Miss 18's beads and topped this up with a mixed bag from ebay. I then hunted out 2 old wire coat hangers (they are thicker than the newer ones) and found various pieces of wire for the decorative bits. Nearly every bead needed another hole drilled in it - painful task and it was ready to be assembled. I had snagged a few pics from an online antique shop of old beds (as well as having 3 cast iron beds in our house) and the design I chose probably wasn't the easiest (curves are more forgiving than straight lines) and not the prettiest, but was the one that I felt was right and I could imagine the house children climbing through the gap at the top. Lots of superglue gel and a little swearing as I coated my fingers and wires didn't behave and I was finished the ends!
Proudly I showed my children (with satisfying oohs and aaahs) and my husband (who is still waiting for me to pass through this regressive stage and return to adulthood) who quite happily commented that the end must be in sight - hmmmm should I disillusion him?
I still need to prime and paint it (I think quick drying spray paint will be needed) but I liked the metallic look and know that when it is painted all the bumps, lumps and rickety bits will show up more, still what can you expect of a bed with 4 children jumping on it! Plus anyone who is thinking about making one can see the process better. If you are going to make one, I would recommend plastic rather than metal beads.
 While on wirework, the hooks on my coatrack were made from head pins - the type with the round head although a flat head would work well too.(The original Jane Harrop coatrack had wooden pegs) Fold the pin in half, bend to your shape and fold the tail back at right angles to insert and glue into a hole drilled in the wood. Close the folded bit together, the illustration is to show the shape. Easy Peasy and very economical!
Welcome to a new follower as well! Maria at http://marivigano.blogspot.com/ I love her red house (miniature) and all her orphan animals (real life) Followers aren't being accepted at the moment, but have a look anyway.


WOW!!! Great job on the bed! It looks fantastic. I can't wait to see it all dressed.
ReplyDeleteGrow up? NEVER!!! lol ;-)
The bed is great! I agree about the straight lines being harder than curves. You have done a wonderful job!
ReplyDeleteThank you Catherine and Carolyn, I value both your praise as I have admired both your beds and they were part of my inspiration. It is primed now and looks really ordinary, but that is what I wanted, so I can't complain. :-)
ReplyDeleteChristine, I love your bed so far!!! It came out really wonderful. It is great to see as I plan on making one for myself in the near future!! I am so glad to have found your site!
ReplyDeletehttp://patty-petit-orphelin.blogspot.com/
Your bed looks wonderful. I'm very impressed. I haven't had much success in working with wire. But I will keep on trying.
ReplyDeleteI like you blog and your handmade very much!
ReplyDeletegreetings Jody.
Unos preciosos cabezales de forja
ReplyDeleteUn saludo
Maite